All files in the PoweredTemplate Print Templates category must be prepared for commercial printing. To ensure that your file is reviewed quickly, please follow the standards outlined in this article.
Formatting Guidelines
All Print Templates items must be in PSD, INDD, or EPS format
Printer’s Marks
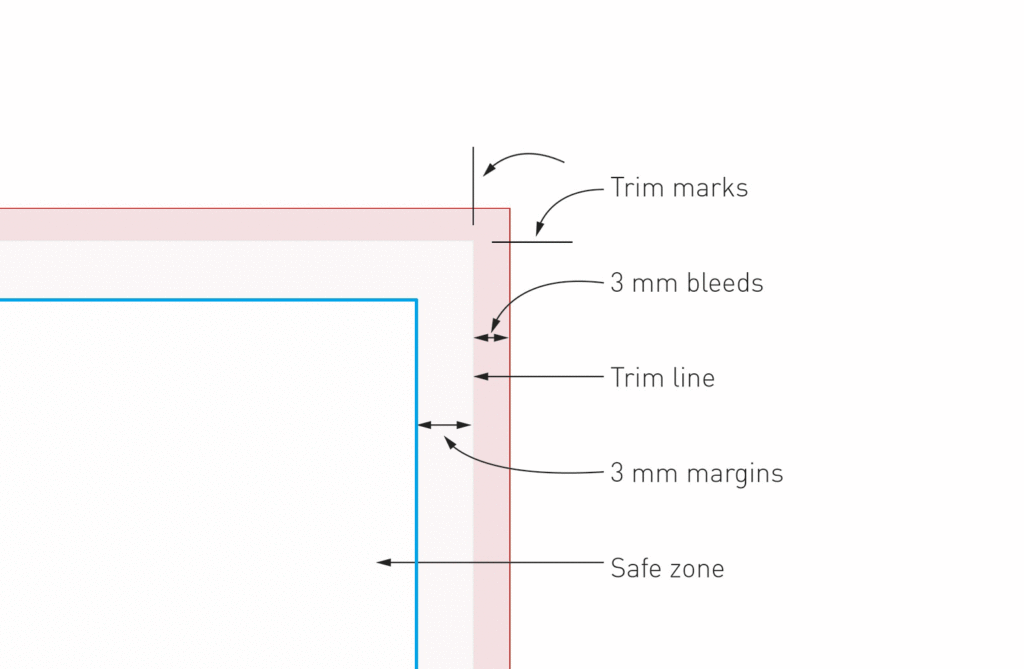
All items regardless of file type must have clearly indicated the printer’s marks, as follows:
- Trim Marks – This is the final size of your print template.
- Bleed – If the image bleeds (i.e., extends beyond the trim line), a setup of US ⅛ inch (0.125”) and UK 3mm must be used.
- Safety Margins – A safety margin of US ⅛ inch (0.125”) or UK 3mm inside the trim line is required.
See the image below for an example of correctly formatted printer marks.

Common Print Sizes
The item’s attributes must accurately describe the file in the download. Your print template must include bleed in addition to the final print dimensions.
The item edit form already contains standard print sizes you may choose from. Also, there is an ability to add a new not yet listed print dimensions. Please refer to this article for more information.
Technical Requirements
- All text must be editable.
- Text cannot be smaller than 6pt.
- Your file must be in CMYK color mode at 300DPI.
- Your file must have clearly labeled layers and organized swatches.
- Placeholder images and other included assets must be linked to the document and included in the /Sources separate folder.
- To be able to use any asset that you didn’t create, you must have the appropriate license. Remember, it’s the responsibility of the author to verify the copyright of the assets used. Read our full article on using outside assets for more information.
- Files, layers, and swatches must be organized and easy to use.
- If you wish to include areas of the design that require special elements such as die-cuts, folds, and spot colors, make sure to clearly label them in your document. Die-cuts & Fold Marks should be placed on separate layers. Remember to name the layers appropriately.
- Spot Colors, UV & Foils should be opaque elements named appropriately and on a separate layer.
- As part of EPS and PSD Requirements – Add Guides to show the printer’s marks and crop marks.
- EPS specific requirements:
- Link images to the EPS file (don’t embed) and provide them in a separate folder /Source.
- The Document Raster Effects should be set to 300DPI.
Once you have got your print template file ready to sell, you should follow our guide to preparing your item for upload.